Wednesday, September 1, 2010

Installing Windows Vista via USB


Well installing Vista through a USB or a pen drive is not only interesting but also makes it’s installation very fast. Vista DVD takes around 20 -30 minutes for its installation but installing it via Vista reduces the time to less than 10 minutes. This blog deals with windows vista support for installing Vista via USB.
Simply follow these steps:

STEP 1
Selecting a Pen Drive
The first step is to get a fast pen drive. The pen drive must be a branded one and is reliable with good speed. The preferable size is 4 GB.

STEP 2
Formatting the Pen Drive
Next step is to format it. Here’s how you do it:
Launch command prompt, you can do so by typing CMD in search bar and hitting enter. Now in command prompt type DISKPART> list disk.
A list of external storage devices will come into view. Make a note of your pen drive disk name. Assuming your disk name is disk 1 the following commands are computed. Change ‘disk 1’ to the correct disk name if it’s different. Now type the following commands:

diskpart
select disk 1
clean
create partition primary
select partition 1
active
format fs=fat32
assign
exit

Note: Make sure you select the right drive in case you have multiple drives.

STEP 3
Copy Windows Vista DVD content to the Flash Drive
Next you need to copy the contents of the Vista DVD into the pen drive. To do so simply type the following command to start copying all the content from the Windows Vista DVD to your flash drive.
xcopy d:\*.* /s/e/f e:\

STEP 4
Setting the Boot Device
Eventually you need to shutdown the computer but don’t remove your pen drive. Now start your PC, and go into BIOS by pressing the ‘Delete’ key. Set the booting device to the pen drive. Save and Exit.Well these are the steps to to get vista help for installing Windows vista in a faster way.
System is now ready to be installed via pen drive.
Tuesday, August 31, 2010

How to boost Vista performance by changing Visual Effects

Boost your Windows Vista Performance by adjusting visual effects settings .It is very easy and will make your system considerably faster. Since Windows Vista is more graphic oriented and is not necessarily adjusted for performance so video settings play a major role in optimizing it’s speed especially in cases where you have low memory (RAM) in your PC.Thus, this blog provides windows vista support for fixing this issue.

Let’s optimize your PC for best performance.

You simply need to follow these instructions to troubleshoot vista and your system will faster and smoother:
When you click this option in the Performance Tools and Information interface, the User Account Control dialog box will display, requiring you to enter administrative credentials. If you're already logged on as an administrator, you'll be prompted to approve continuing. This opens the


Performance Options dialog box.

However you can also access the Performance Options dialog box in this way:
Go to Control Panel | System | Advanced System Settings | Settings button in the Performance section...


Either way, on the Visual Effects tab, you have these choices:
• Let Windows choose the best settings for your computer
• Adjust for best appearance
• Create custom settings, choosing to turn on/off whichever visual effects you want.

You may select the setting; Let Windows choose what’s best for my computer. If you have well enough Memory (RAM) according to Windows Vista then almost all the settings would be checked.
In addition to this you can change the settings between Adjust for best performance or if you believe you have really good RAM and you want the best appearance then you may choose Adjust for best appearance.
If you don’t want to compromise the full appearance but still want to improve the performance then you can manually uncheck the items that you don’t want.Remember that you can also visit my windows xp support blog in case you have Windows XP.

Note: The more visual effects you have turned on, the more the hit on performance. If you choose the option to adjust for best performance, all of the visual effects will be disabled. You may want to turn off those effects that are purely aesthetic, such as transparent glass and fading or sliding menus, while leaving on those that are more functional, such as showing thumbnails instead of icons.

Thus, these settings will definitely make your system, faster, smoother and boost best performance.


Monday, August 30, 2010

Enabling Remote Desktop in Windows Vista

With Remote Desktop Connection feature of Windows Vista, you can access a computer running Windows from another computer running Windows that is connected to the same network or to the Internet. However Remote Desktop is disabled by default in Windows Vista, so the first step is to activate it on the system you want to control. This blog will be very helpful in solving this issue. Let’s explore on enabling Remote Desktop in Windows Vista on this article.

OK... Let’s start! Here is how you can do it:

1) Go to Start, right click Computer and then click on Properties.


2) The computer properties window will appear, and then you click on Remote settings.

Note: You can also open this window by going to Control Panel -> System.

3) Well in order to enable the connection you need windows vista support on remote desktop connection.For this go to Remote tab > System properties window> Allow connections. Other then this you can also, Select Users button to choose the users that can connect to this computer remotely. Finally, click Apply and OK button.


Note: It is important here to note that computers running Remote Desktop with Network Level Authentication (more secure) option are accessible remotely. If you want to check, just open the client and click on upper left corner icon to open the about window, you will then find out whether it’s supported.


Note: By default the existing user id that you used to enable this Remote Desktop will be authorized to connect remotely. In this case, Ivan already has access as my current logged on user id is Ivan. You can click Add... to add other users.

Moreover the Remote Desktop must be enabled as exception on Windows Firewall! If not the traffic will be dropped by this firewall.In that case will be required to troubleshoot vista.


In addition to this also make sure Block all incoming connections check box is cleared! If it’s check, then no remote connection can be made from other computers.

Well this should work for both Windows 7 and Windows XP as well.

Saturday, August 28, 2010

Disable the Annoying "This page has an unspecified potential security risk" issue

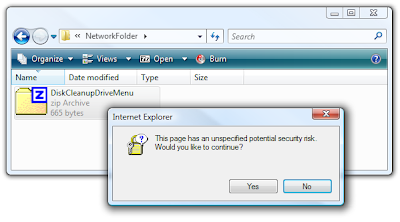
Have you ever right-clicked on a file from a mapped share and gotten this really irritating popup message from Windows Vista. So if you want to get rid of this annoying message then you should go for windows vista support. This blog will help you out in dealing this issue.
Let’s Sort it out!!!

The Problem
Whenever you try and right-click a file, like a zip file, you’ll get an irritating popup: “This page has an unspecified potential security risk. Would you like to continue?” It’s even more annoying cause, well, I’m NOT using Internet Explorer!
The problem gets worse… if you try and drag/copy files out of the folder you’ll get the error “Do you want to move or copy files from this zone?”
The Reason
The main reason for this error is that, Windows is assuming a security risk, since it is not detecting your local network. That is the reason why there has been an urgent need for vista help. This all goes back to the concept of “Security Zones” that you might have seen if you’ve ever looked in Internet Explorer’s options panel. This security mechanism is definitely annoying, but it really is a necessary evil.
What we’ll do is manually add the mapped drive computer name to the exception list.

The Solution
Well there is no need to install any virus removal software. You simply require following these steps:
• Open up Internet Options from Internet Explorer’s Tools \ Options menu, or from the Control Panel.

• Select Security tab.

• Click on the “Local intranet” icon. • Then click on the “Sites” button.
If you only map drives to a few machines, what you can do is click on the “Advanced” button, and then add each machine name with this format:
1. file://computername
2. Now click the Add button. (Make sure to click the Add button!)

Note: If you are using an IP address to map drives then this method will not work. You’ll need to switch to using the computer name when mapping drives in order to remove the messages. Moreover you also need to follow the same instructions in case of windows 7 support.
Now that we’ve added the exception, you can right-click on the file without any issues. You can also copy files and generally interact with the network share without problems.

Thursday, August 26, 2010

Setting up a shared internet connection in Windows Vista


In windows vista we have a great option of sharing the internet connection between two or more computer without adding a additional cost associated with the modem and phone line.
Although the awareness about the feature is not that much, and users tend to miss out on that.

Here we are providing the Windows Vista Support to setup the Internet Connection Sharing, abbreviated to ICS in Windows Vista.

If you are using Windows XP you can visit out Windows XP Support Blog and find the Steps to setup Internet Connection Setup in Windows XP

ICS is mostly good if you have a fast Internet connection such as a DSL or a cable modem that provides an adequate amount of bandwidth for several computers under normal conditions.
Steps to connect the Windows Vista PC to ICS.

  1. Start with the computer that will share the Internet connection. First set up your Internet connection,and then use the Network Setup Wizard to configure the computer by taking the following steps
  2. Create and test an Internet connection using the information in the “Connecting to the Internet”.
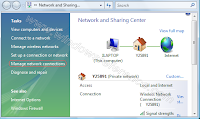
  3. Click on start Right-click Network and choose Properties from the context menu. You’ll see the Network and Sharing Center window.Click the Manage Network Connection link.
  4. You’ll see the Network Connection window.You must have a atleast two active network connections to make ICS work. The first connection is from your computer to the Internet. The second connection is from your computer to the rest of the network.

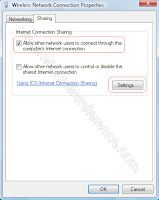
Right-click the connection to the Internet and choose Properties from the context menu.Select the Sharing tab. You’ll see sharing options like the ones shown.Check the first option to let other people use this connection to access the Internet. If you want to also allow others to manage the connection ,check the second option.Click Settings.

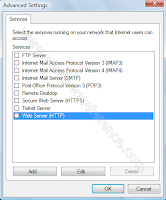
You’ll see the Advanced Settings dialog box shown where you can control the services that others can use on your system.

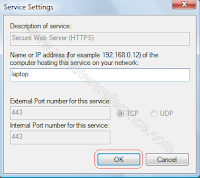
Check the standard services that you want other people to access.lick Add to add custom services to the list. You’ll see the Service Settings dialog box . Custom services require that you provide an IP address

and port umber. You can make your custom service less vulnerable by choosing a different setting for the fourth field, Internal Port number for This Service, to a different value than the external port number.Click OK to add the custom service. ICS enables the option automatically.

Click OK twice to make the ICS connection functional. Vista will ensure that the connection doesn’t have any problems such as address conflicts.

Wednesday, May 5, 2010

Few Simple Tweaks to Speed Up Windows Vista

Windows Vista has been out now for over two years though many users have yet to make the switch. Whether you're new to Vista or have been plugging along since its introduction, you may not be familiar with the built-in Vista performance tools. These tools are an excellent place to begin tweaking and troubleshooting computer performance.

Performance Information and Tools

First, go into the Control Panel and click on Performance Information and Tools. The next screen that opens is broken down into a main section summarizing your computer's performance and a Task pane.

Vista uses a "Windows Experience Index" that scores your system's processor, memory, graphics card, gaming graphics, and primary hard disk. You'll see your computer's score in the main screen. Your computer's Windows Experience Index score is determined by the lowest sub-score. If your score is exceptionally low, upgrading your lowest performing component can improve performance.

However, hardware upgrades aren't the only way you can speed up Windows Vista. Take a look at the links in the Task pane:

• Manage startup programs

• Adjust visual effects

• Adjust power options

• Adjust indexing

• Open Disk Cleanup

• Advanced tools

Go through each of these tasks and make performance adjustments. For example, managing programs that launch each time Vista loads is an excellent way to reduce demand for resources. Do you really need QuickTime or Real Player loaded at all times? If programs that you don't generally use are loading with Vista, they are taking up memory and slowing down your computer. Removing unnecessary programs from startup does not remove them from your PC, but it can improve Vista performance.

Visual effects are notorious power sappers. If your computer is particularly slow, turn off the Aero interface and enjoy an immediate performance boost. Experiment with the other settings until you find the right balance of performance and appearance.

Several power plans are available in Windows Vista including: Balanced, Power Saver, and High Performance. If battery power is not a concern, switch to High Performance.

Indexing the hard drive makes searches much faster. Rather than searching the entire drive for a file, Windows will search the index (if indexing has been enabled). However, you
should only index folders or directories that contain your personal files - not the entire hard drive.

Cleaning up the hard disk using the Disk Cleanup tool can also improve Vista's performance. Regularly clean your PC of temporary Internet files, temporary downloaded program files, cookies, and other clutter.

Tuesday, May 4, 2010

Will Windows Vista Support Last?

Many people have not realized that Windows Vista will be superseded by a newer operating system in the near future. That means that the XP support and Windows Vista support may be at stake. The reason why support has not been cut for Windows XP is because of all of the problems that were associated with Windows Vista. The new operating system that is going to come out really only has one purpose. That is to fix all of the incompatibilities that were associated with Windows Vista. That means the moves from one operating system may be much faster than some people's transition from Windows XP to Windows Vista. What will this mean for Windows Vista support?

Well once possible outcome is the same thing that happened to Windows ME. Windows ME was short lived because so many people complained about too many things that were associated with Windows ME. So instead of spending a lot of time and trying to fix each and every problem, Microsoft decided to build an entirely new operating system to replace Windows ME. Not long after support for Windows ME was discontinued. Windows Vista has been found in a similar situation. There are so many things that are wrong with Windows Vista that it may also put Windows Vista support in jeopardy. Even though so many people have Windows Vista already installed in their desktops and laptop it will not change anything. Windows ME was discontinued almost right after its prime which stunned a lot of people.

If the new operating system that is suppose to replace Windows Vista is successful in getting rid of most of the incompatibilities that are associated with Windows Vista then you will problem not see Windows Vista support last version long. What does that mean for you if you are using Windows Vista?

If there is no longer any Windows Vista support then Microsoft will stop making updates and fixes for Windows Vista. Even if there is some new security threat you will probably not protect as well if you were using the new operating system that is supposed to be called Windows 7. This is the same thing that happened to Windows ME support. Windows Vista support could just suddenly stop and almost force people to upgrade to the new Windows 7 or any other operating systems that may be introduced in the near future to accompany Windows 7.